
 Home
 User Guide
 Developers
 Payment Gateways
 Integrations & Tools
 Site Usage
 Troubleshooting

Important: When the Tebex Store module is activated, the classic credit packages on the management panel remain disabled and replaces the Tebex Store. Credit products are now managed from packages on the side of the Tebex, not from local packages.
How to calculate credit?
Our system credit quantity Number of packages takes:- 100 Credits Package = 100 credit
- 250 Credits, 500 Credits The amount of credit in the package names should be clearly indicated.
- If there is no number named package, the sale price of the product can be used as backup. The most guarantee way is to write a clear number on the package name.
1. Activate the Tebex Store module in Zonely
From the management panel: Settings → Addons → Puzzle Store Activate the Tebex Store module and switch to settings screen.2. Create projects on Tebex.io
- Tebex Creator PanelLogin to ’ and login to ’ Create a Project Start (New Project)
- Project Name Type your server name in the field.
- Currency default currency from the domain (e.g.. Select USD.
- Your Project From I Play a game server Check the option.
- Continue by confirming the user contract.
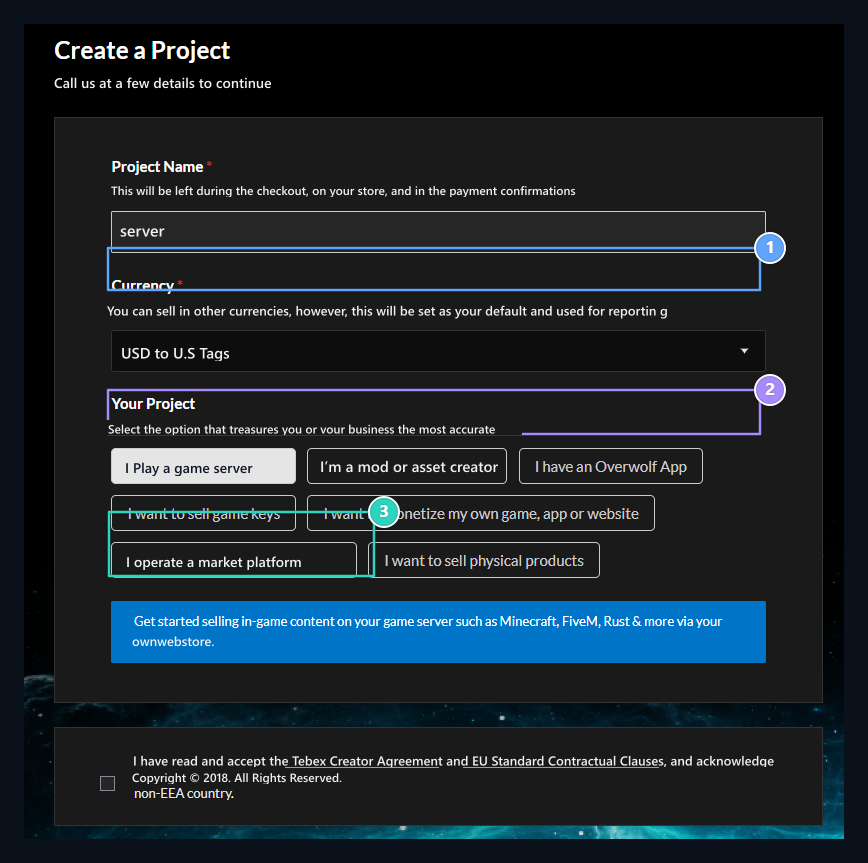
1. Project Name
Type your server name.
2. Currency
Select the reporter and the sales currency.
3. Your Project
Check ‘I operate a game server’ option.
3. Game and platform selection (Optional: Offline Mode)
From the game list MinecraftSelect ’.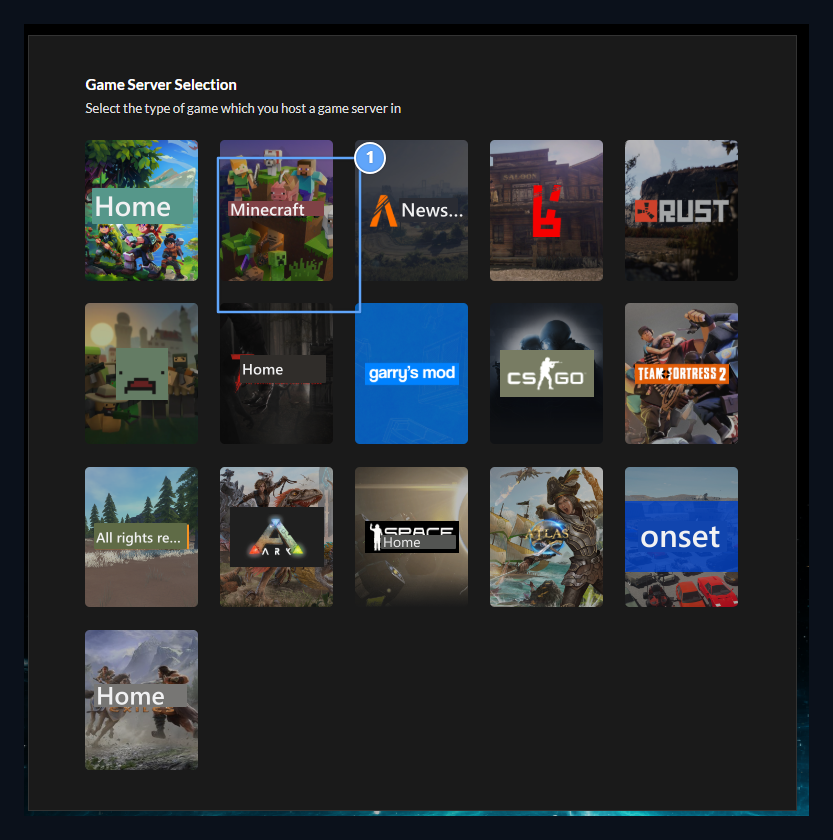
1. Minecraft Selection
Click on Minecraft box from the game server list.
Platform selection: Minecraft Offline
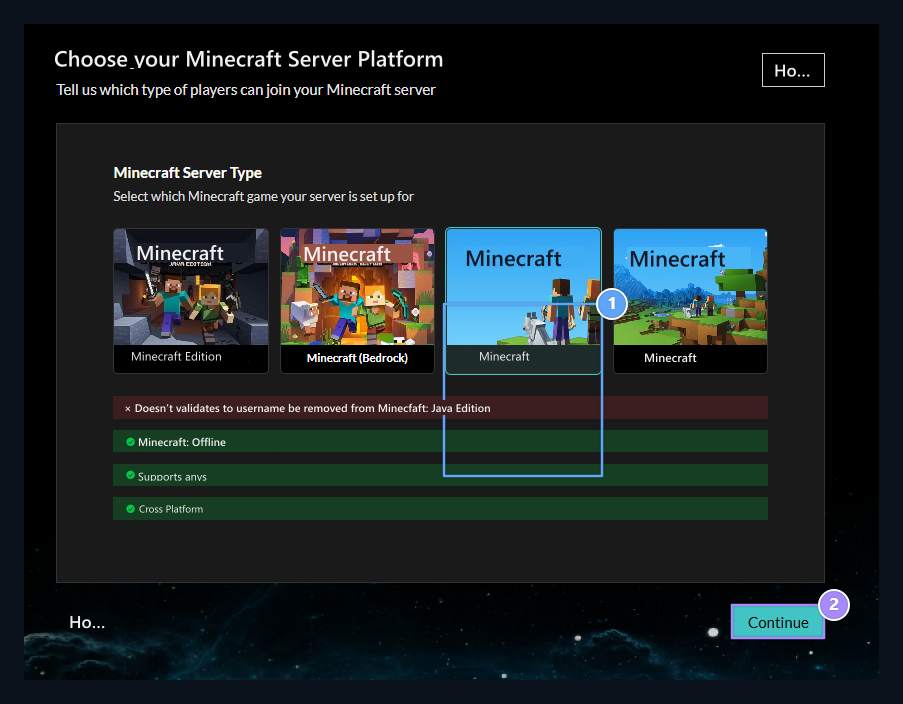
1. Minecraft Offline Platform
Check Minecraft Offline option from the platform list.
2. Continue Button
Click Continue button to confirm the selection and pass to the next step.
4. Public Token, Secret Key and Webhook URL
Tebex Creator Panel from left menu Integrations Open the tab.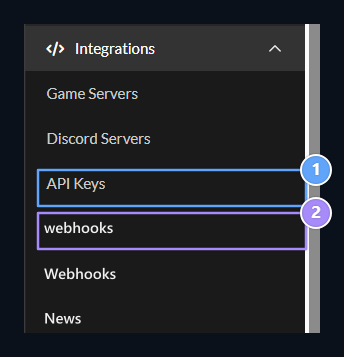
1. API Keys Menu
Open the API switches section.
2. Webhooks Menu
Manage order notification points.
Copy API keys
- Integrations → API Keys Enter the section.
- Public Token copy value and copy the value in Zonely management panel Public Token Paste it in the field.
- If there is no key in Private Key field Company Generate a new key by pressing the button and in Zonely TEBEX Secret Key Paste it in the field.
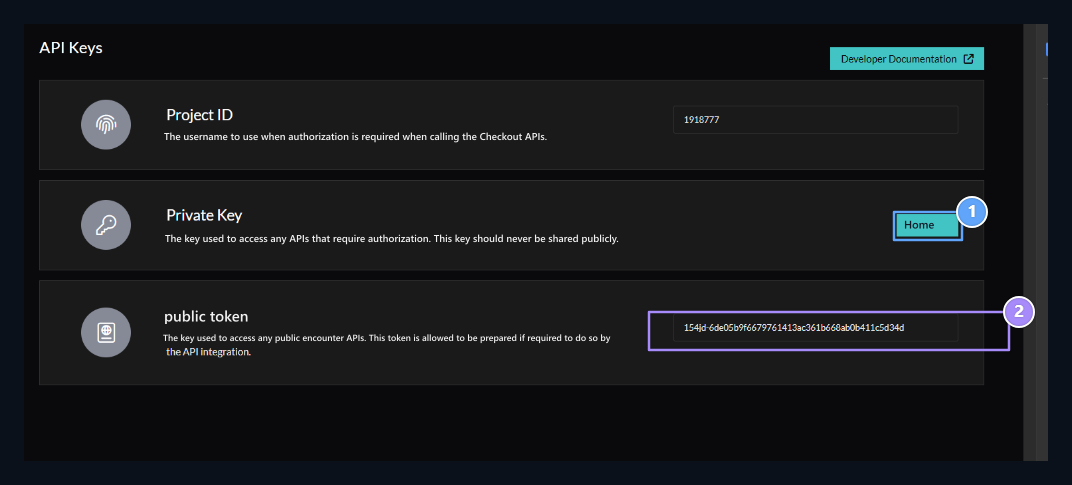
1. Private Key Production (Generate)
Generate new key by clicking Generate button and enter Zonely TEBEX Secret Key field.
2. Public Token Value
Copy the Public Token value and paste it in Zonely Public Token field.
Webhook URL definition
- In the panel of the midx Integrations → Webhooks → Endpoints → Add Endpoint Click on the button.
- Select all events.
- Endpoint URL Type the following notice address in the section:
- Register. Enter the webhook section to check the integration fit is correct.
[!WARNING] Important: Webhook does not have a order notification without verifying. Tebex confirms your site’s response by sending test webhook first.
5. Create credit pack
- In the panel of the midx Packages Enter the section.
- Add New → Package Click the option.
- Type the package name with credit quantity:
100 Kredi250 Kredi500 Kredi
- Fill out price, description, category and visual information.
- Create a Save with.
[!TIP]
You must write the amount of credit in a clear number on the package name (100 Kredi like). The system automatically reads this number and adds it to the user account credit.
6. If you receive deliveryable error
Sometimes when creating a package Home can give alert. This alert shows that webhook URL on the top is not yet verified. If you receive such a warning:- First API Keys and Webhook Complete steps.
- Save the package again after Webhook verification is successful.
- For credit loading packages, you don’t need to add in-on-game script (deliverable) on the Tebex side; system automatically uploads credit via webhooks.
7. Live (Live) transition to sale and Tebex approval steps
After you have created your project, a onboarding alert notification is located at the top of the management panel:
Continue onboarding: You can only use the payment methods as your project is setup & approved by our Content and Safety team. Only test methods are active until your store is examined and approved by the Tebex Content and Safety team. To get real player payments (to go to live mode) Before you live steps must be completed.
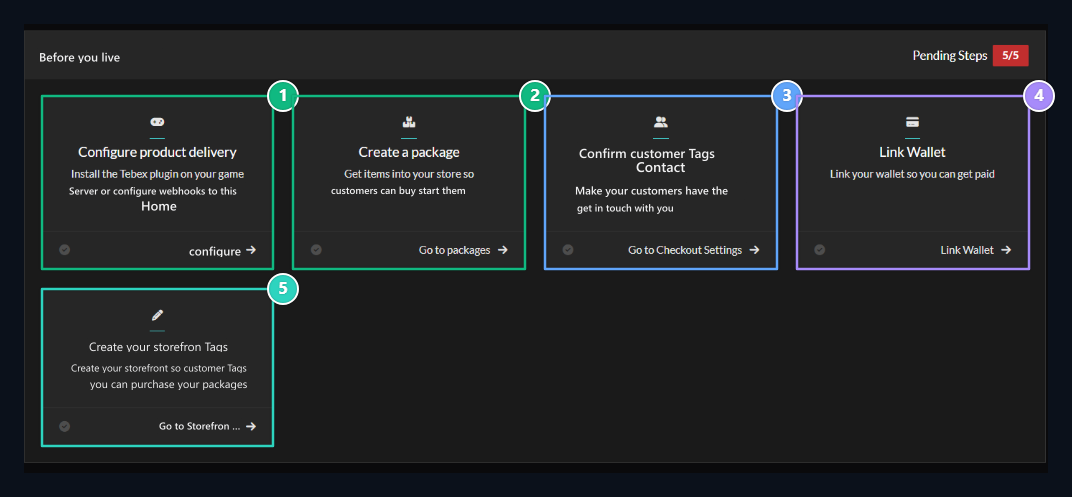
1. Configure delivery (Complete)
Already done: 4. step in step
https://siteniz.com/process/tebex_store The webhook connection is added and the delivery adjustment is completed.2. Create package (Complete)
Already done: 5. credit packages compatible with your site in step (
100 Kredi etc.) created.3. Support Contact (Content)
Go to Checkout Settings Click on the link and verify your official support email address that your players can access to you.
4. Link Wallet (Waring)
Link Wallet Connect your bank or payment wallet method to transfer your sales revenue by pressing the button.
5. Create Storefront (By)
Go to Storefront Start or save your store display with.
Approval Process: When you complete support email, wallet and display steps, your project will be received at the confirmation queue of the Tebex Content and Safety team. When the review is approved, the test mode alert on the top is removed and the Tebex Store starts to work as live (Live) directly with actual payments.